This is part 2 of my prior post that continues where I left off. I previously showed how you can use Resource folders in either the Notebook or Environment in Microsoft Fabric to do some pretty agile development of Python modules/libraries.
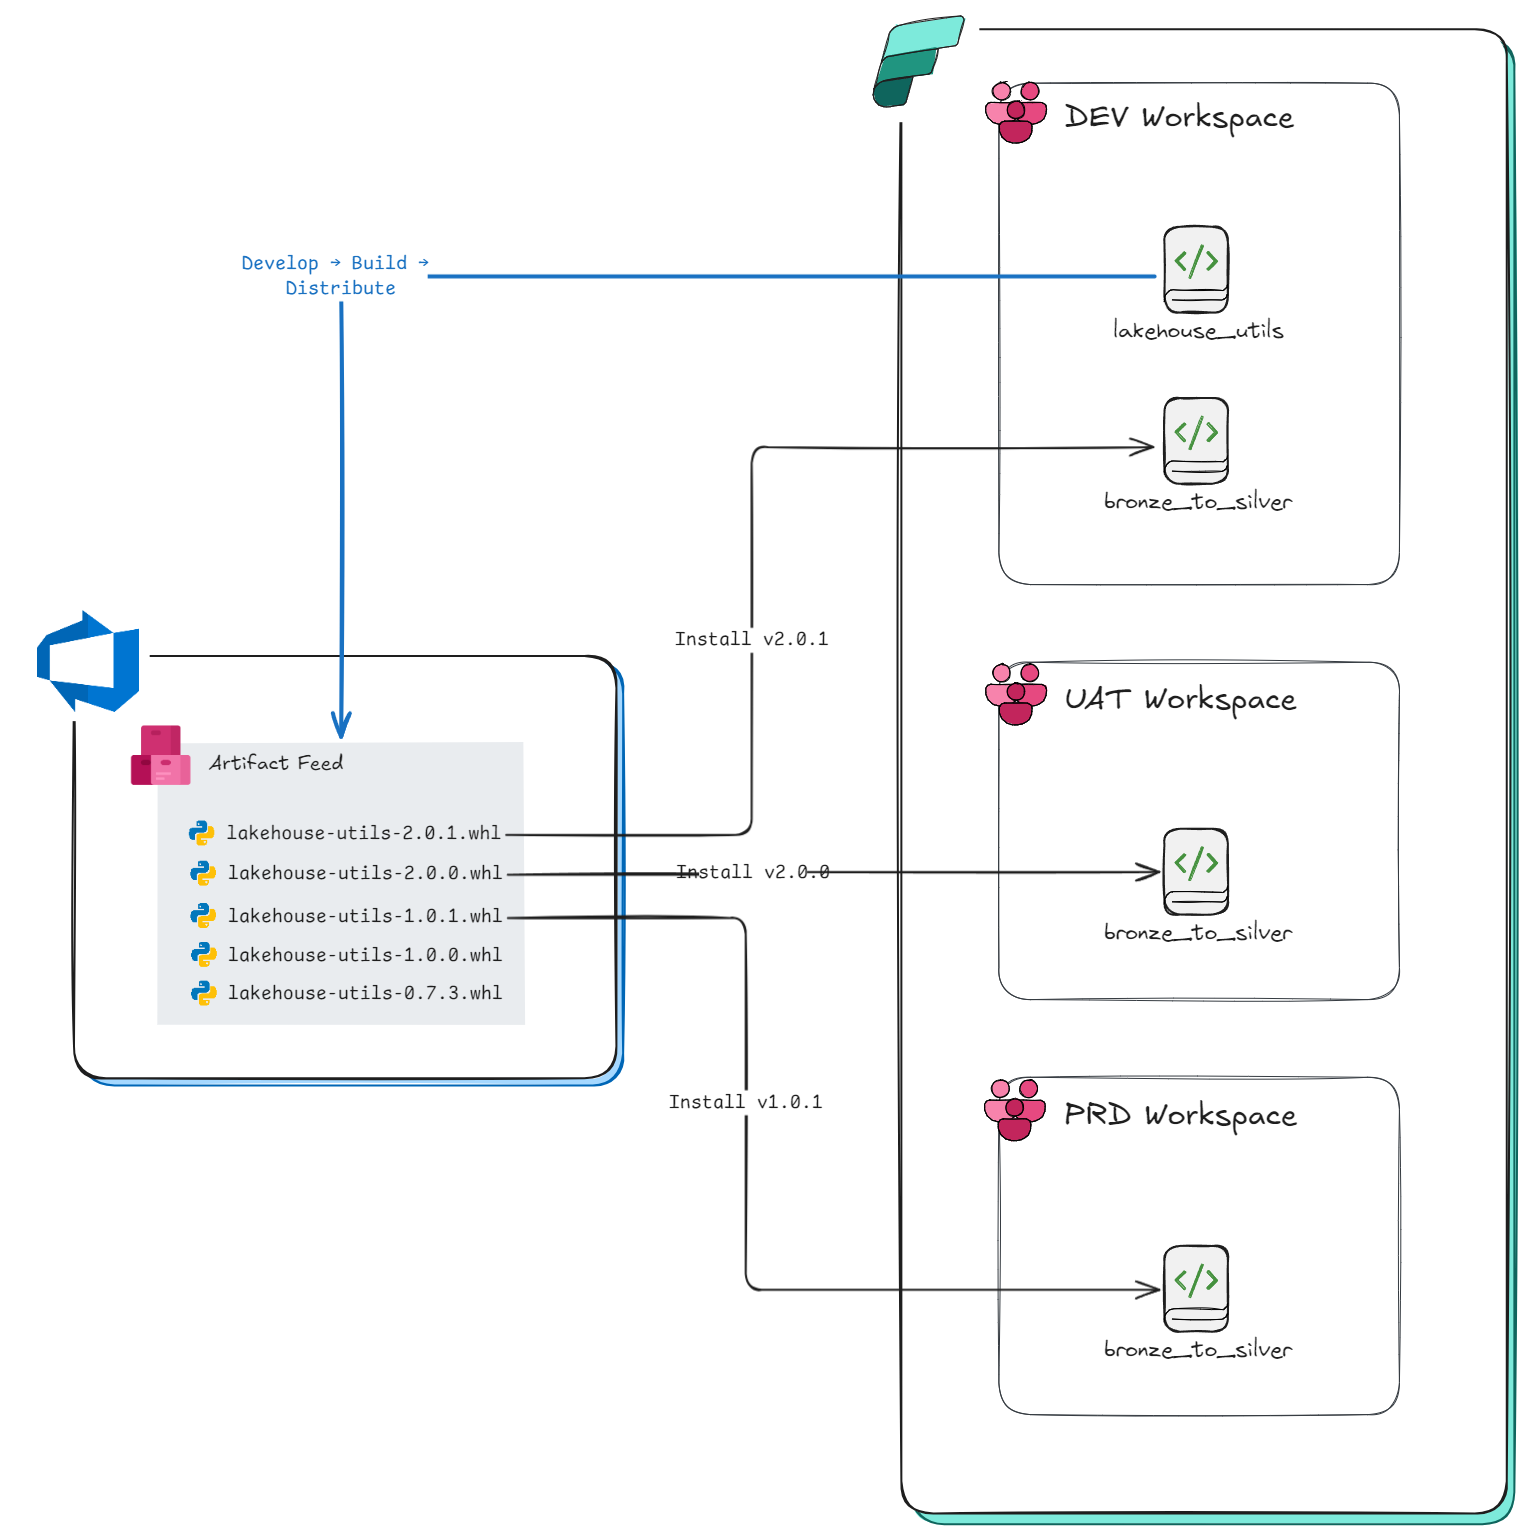
Now, how exactly can you package up your code to distribute and leverage it across multiple Workspaces or Environment items? How could we acomplish something like the below?
Building / Packaging
While you can certainly run all of this code locally on your machine, everything I’ll show in this section will be 100% from the Fabric Notebook UI. Sure, doing some of this stuff locally can be more productive, but there’s something convenient—and a little magical—about being able to do everything in your browser.
Packaging a Python library results in a single compressed file, a “wheel” file with the .whl extension. For anyone new to Python, this is really just a ZIP archive (you can rename it to .zip and peek inside) that contains all of your Python modules, metadata, and references to any dependencies your library needs.
Since all I had in the prior blog was a single utils.py module, I’ll need to add a couple of other files to support making this a packageable library.
-
__init__.py: Since the module is no longer in the root of the library folder, I need an
__init__.pyfile. This is required for any folders within the root directory where you have modules that need to be included in the build process. This is an empty file. - setup.py – This Python file contains metadata about your library and instructions for packaging. Create it in the root of your library directory.
 from setuptools import setup, find_packages

 # Read the contents of your README file
 with open("README.md", "r", encoding="utf-8") as fh:
     long_description = fh.read()

 # Read the contents of the requirements.txt file
 with open('requirements.txt') as f:
     requirements = f.read().splitlines()

 setup(
     name="lakehouse_utils",
     version="0.1.0",
     author="Miles Cole",
     description="Example Python Library",
     long_description=long_description,
     long_description_content_type="text/markdown",
     url="",
     project_urls={},
     classifiers=[
         "Development Status :: Development",
         "Programming Language :: Python :: 3",
         "Operating System :: OS Independent",
         "Topic :: Benchmarking",
         "License :: OSI Approved :: MIT License",
     ],
     python_requires=">=3.10",
     install_requires=requirements
 )
In the above setup code, the
name,version, andpython_requiresfields are key to generating the name of the resulting WHL file:lakehouse_utils-0.1.0-py3-none-any.whl. The parts of the WHL file name have the below basic pieces of information.f"{name}-{version}-{python_version}-{os_specific}-{architecture_specific}"Anytime you are making code changes you should evaluate if it is a major (0.1.0 → 1.0.0), minor (0.1.0 → 0.2.0), or revision (0.1.0 → 0.1.1) to your existing code and then update the version metadata in
setup.pyaccordingly. - requirements.txt – This simple text file lists any dependencies your library requires. My module is pretty simple, but here’s an example of what this file might look like:
 sqlglot==25.23.0
 JayDeBeApi==1.2.3
Even if you don’t have dependencies yet, I still recommend including an empty
requirements.txtfile. This way, you won’t need to refactor anything later when you eventually do. - README.md: Technically optional, but required from a human decency perspective. Be kind to the future developer (or your future self!) who might inherit your work—add a README!
After creating the basic structure, it could look something like the below:
lakehoues_utils/
└── lakehoues_utils/
    ├── __init__.py # tells the build process that this directory contains a module in scope for packaging
    └── utils.py # source code
├── README.md # documentation
├── requirements.txt # dependencies
└── setup.py # build instructions
If I had not put
utils.pyin a folder in the root called lakehouse_utils, the eventualimportstatement would’ve beenimport utils. To make the import more descriptive and avoid ambiguity I moved utils into a subfolder called lakehouse_utils so that theimportstatement becomesimport lakehouse_utils.utils.
Now that the structure is in place, let’s build the library. I like to add the following code into the same Notebook used for developing and testing the module. That way, I can make a quick change, generate a new build, and finish by publishing the new version to an artifact repo—all in one Notebook.
install_packaging_libs = !pip install setuptools wheel

import os
# Change directory to the library's path
os.chdir('/synfs/nb_resource/builtin/lakehouse_utils')

# Clean the build directory
!python setup.py clean --all
# Build the wheel file
!python setup.py bdist_wheel
Just update the path to your library’s root directory based on where it lives:
- If using Notebook Resources:
/synfs/nb_resource/builtin/<root_folder_name>os.chdir('/synfs/nb_resource/builtin/lakehouse_utils') - If using Environment Resources:
/synfs/env/<root_folder_name>os.chdir('/synfs/env/lakehouse_utils')This results in a
.whlfile being generated in a new./dist/(distribution) folder. From here, we can install it directly before publishing to an artifact repository.
%pip install '/synfs/nb_resource/builtin/lakehouse_utils/dist/lakehouse_utils-0.1.0-py3-none-any.whl`
Distributing
Are we done yet?? Not unless you enjoy manually uploading your newly minted library to various Environment items and worrying about keeping things in sync as you have new versions to publish.
Rather than manually distribute your library, the best practice is to publish it to a central artifact repository. When apps or Notebooks need it, they simply fetch the trusted version automatically.
This has major benefits:
- Trust – Manually sharing
.whlfiles is risky. Someone could overwrite, corrupt, or even maliciously tamper with the package. Centralized repositories like PyPI or Azure DevOps Artifact Feeds offer access control, provenance, usage stats, and a tag classification system. - Versioning – Since versions are immutable by default, you can rely on consistent behavior over time. Once published, the code won’t change unless you explicitly choose to upgrade to a newer version.
- Single source of truth – One place to publish. One place to consume. One less governance headache.
Could we publish this to PyPi for public distribution? Sure, but most organizations do not open-source their code given that it is often organizationally specific in nature, therefore I’ll be showing how you can publish libraries to a private repository. In this case I’ll be using Azure DevOps Artifacts as the hosting service, but this same process generally applies to any other service, you need to provide authentication and use a specific API to publish your library.
For those who are GitHub fans, GitHub sadly doesn’t support Python libraries in it’s artifact repository service.
Setting up an Azure DevOps Artifact Feed
There’s two very basic steps to follow that the ADO docs effectively illustrate:
Publishing the library
I’m referencing my Azure DevOps PAT token stored in Azure Key Vault to avoid storing any credentials in plain text. Run the code below to publish:
import subprocess
import sys
# Input Params
ado_org_name = 'milescole'
ado_project_name = 'library_dev_demo'
ado_artifact_feed_name = 'DataForge'
key_vault_name = 'mcoleakvwcus01'
key_valut_pat_secret_name = 'milescole-ado-pat'
whl_path = "/synfs/nb_resource/builtin/lakehouse_utils/dist/lakehouse_utils-0.1.0-py3-none-any.whl"
repo_url = f"https://pkgs.dev.azure.com/{ado_org_name}/{ado_project_name}/_packaging/{ado_artifact_feed_name}/pypi/upload/"
artifact_pat = notebookutils.credentials.getSecret(f"https://{key_vault_name}.vault.azure.net/", key_valut_pat_secret_name)
# Install twine and wheel
install_publishing_libs = !pip install twine wheel
# Publish Library
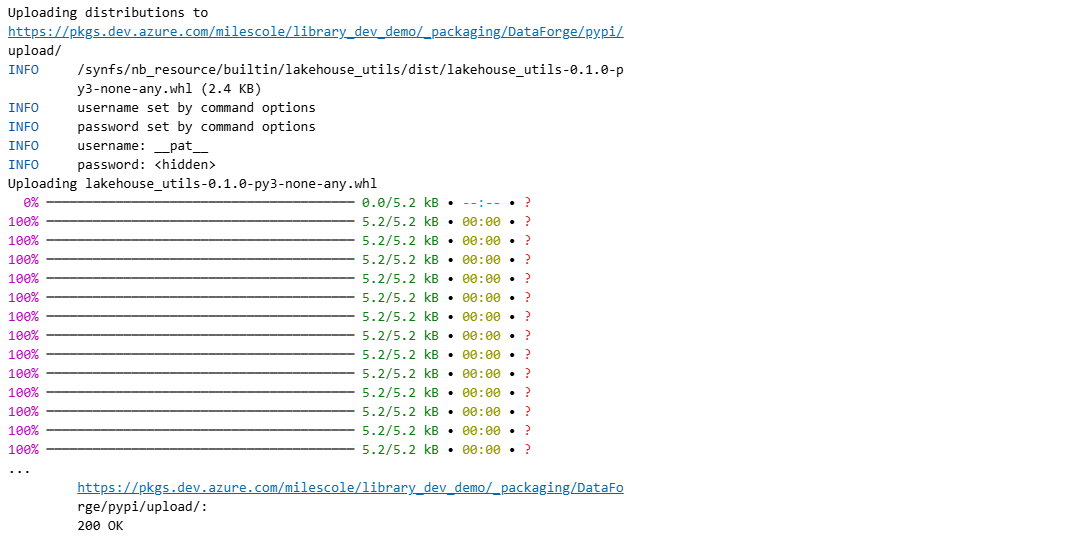
result = subprocess.run([
sys.executable, "-m", "twine", "upload", "--verbose",
"--repository-url", repo_url,
"-u", "__pat__", "-p", artifact_pat,
whl_path
], capture_output=True, text=True)
stdout = result.stdout or ""
stderr = result.stderr or ""
combined_output = stdout + stderr
print(combined_output)
The result confirms the library upload was successful:
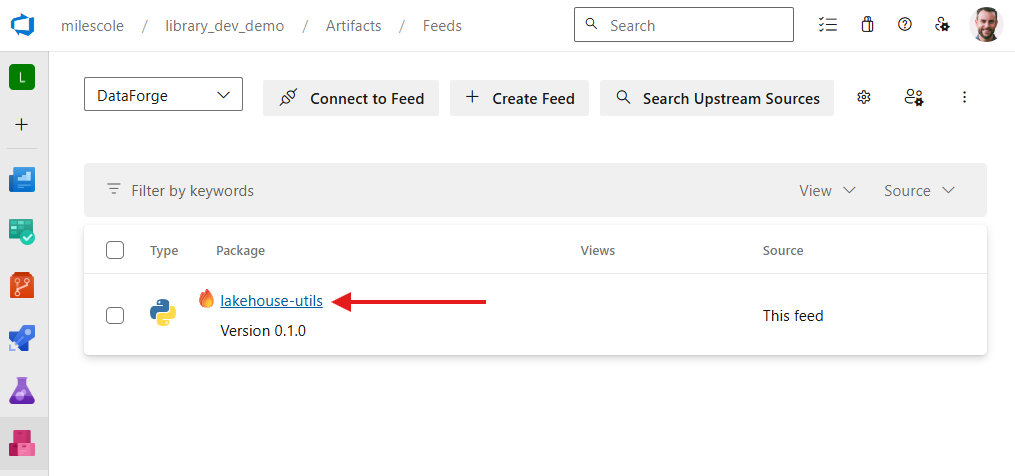
If we check Azure DevOps, we’ll find that the latest version now appears in the Artifact feed:
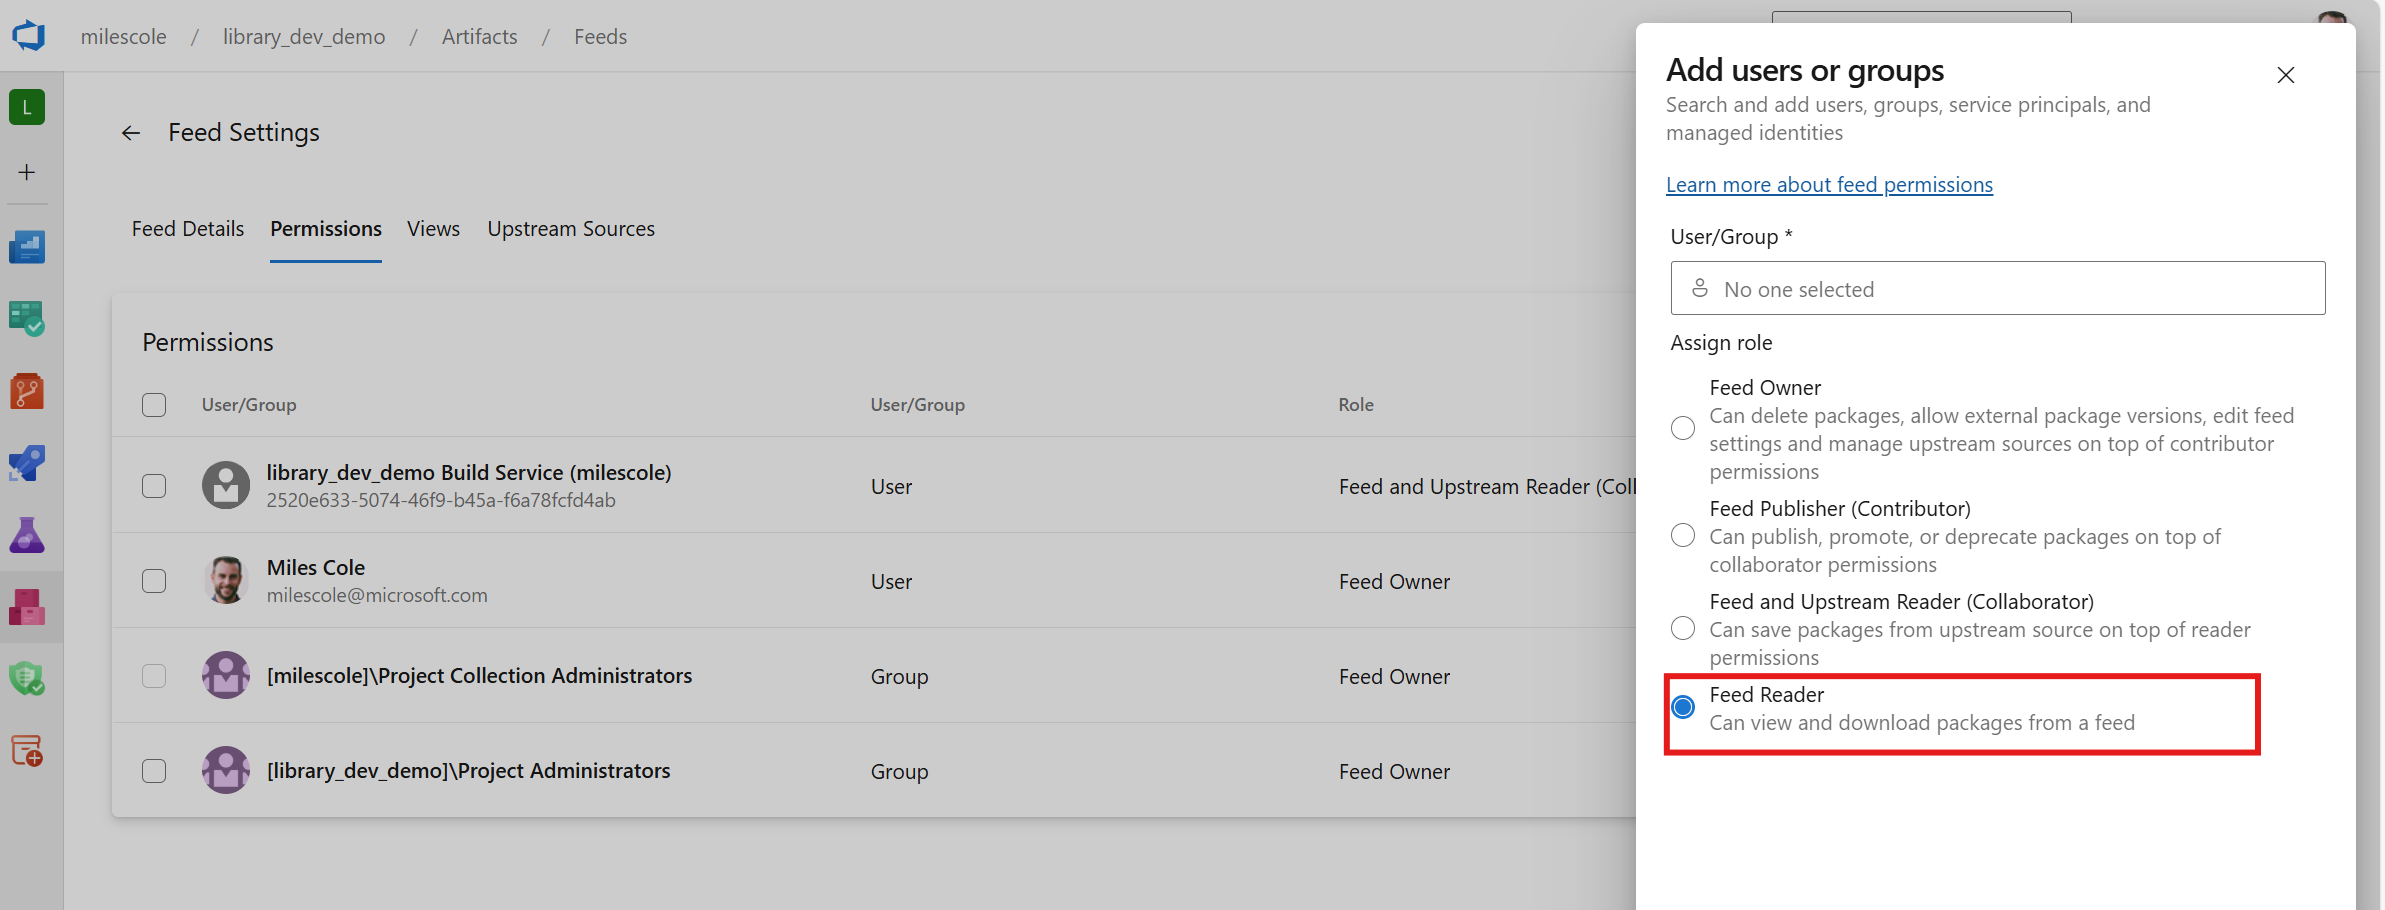
We then assign a minimum of Feed Reader permissions to consumers so they can access and install the package:
Using a Private Artifact Repository in Fabric
Alright, so we’ve got our library safely tucked into our fancy Artifact feed—how do we actually use it inside Microsoft Fabric?
While Environment items don’t currently support private feeds, you can install the library from a Notebook using a pip command.
Normally %pip can’t be parameterized, but we can work around that using get_ipython().run_line_magic()—a neat trick that lets you run magics inline with Python code.
# Input params
ado_org_name = 'milescole'
ado_project_name = 'library_dev_demo'
ado_artifact_feed_name = 'DataForge'
key_vault_name = "mcoleakvwcus01"
key_valut_pat_secret_name = "milescole-ado-pat"
library_name = "lakehouse-utils"
library_version = "0.1.0"
# Get PAT
artifact_pat = notebookutils.credentials.getSecret(f"https://{key_vault_name}.vault.azure.net/", key_valut_pat_secret_name)
# Execute PIP
install = get_ipython().run_line_magic("pip", f"install {library_name}=={library_version} --index-url=https://{ado_artifact_feed_name}:{artifact_pat}@pkgs.dev.azure.com/{ado_org_name}/{ado_project_name}/_packaging/{ado_artifact_feed_name}/pypi/simple/")
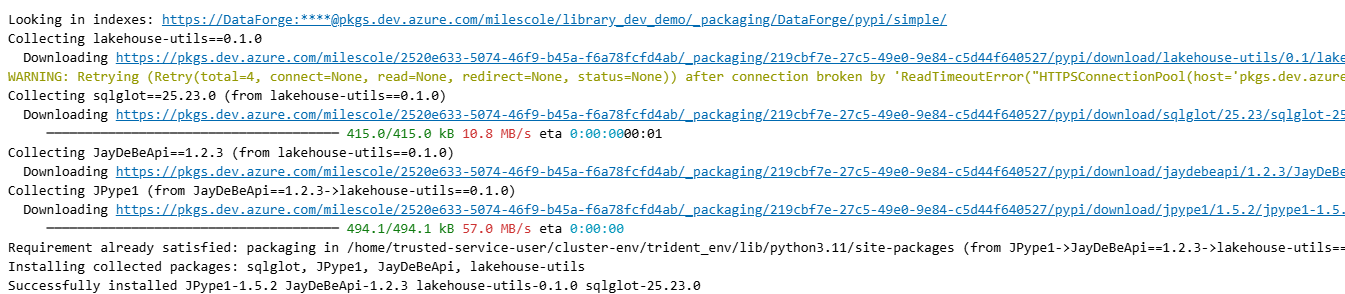
Easy, right? If you don’t need parameters, you can reduce it to two lines:
artifact_pat = notebookutils.credentials.getSecret(f"https://mcoleakvwcus01.vault.azure.net/", "milescole-ado-pat")
install = get_ipython().run_line_magic("pip", f"install lakehouse-utils==0.1.0 --index-url=https://DataForge:{artifact_pat}@pkgs.dev.azure.com/milescole/library_dev_demo/_packaging/DataForge/pypi/simple/")
Now all that is left is to import the library and you’re off and running with being able to take advantage of modular, governed, and easily download code assets.
import lakehouse_utils.utils
Note: If your private package includes dependencies from PyPI, they’ll be automatically mirrored into your artifact feed—effectively giving you a private backup.
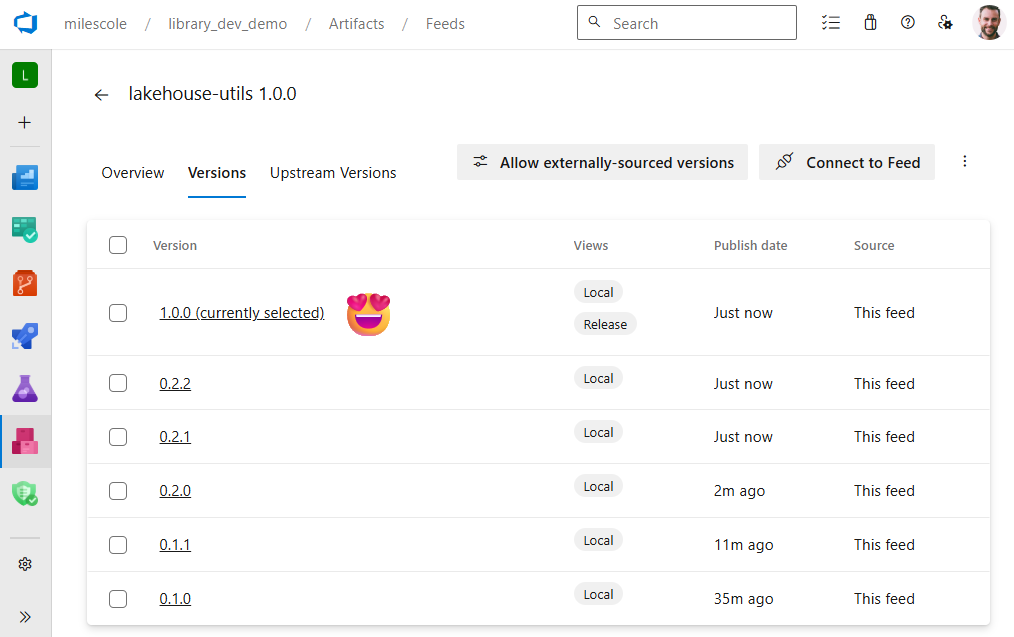
Library Versions
Now, if the value of this whole effort still isn’t totally clicking, let’s explore one more thing that’s truly the bee’s knees: library versioning.
So far, I’ve published version 0.1.0 of my lakehouse-utils library. Now imagine this: my company decides to start using this beta version in production 😬. Sure enough, feedback starts pouring in from other devs—feature requests, bug reports, naming complaints, the usual. I go back to the drawing board, roll up my sleeves, and after a few minor and patch updates, I finally ship the first stable, non-beta version, 1.0.0.
Life is good. Everywhere I go, people give me that subtle nod—you know the one that says “yeah, we know… the library is out of beta now.” I start walking a little taller. I’m basically a celebrity.
But then, back to reality: how do we actually start using this shiny new version, especially since it includes some breaking changes as part of its rise to glory in the anals of artifact repos?
Well, first consider what our library version history looks like in Azure DevOps. We’ve got every published version sitting there nicely. It’s beautiful.
And here’s where it gets powerful: maintaining older versions means we can continue building and testing new functionality in dev using 1.0.0, without breaking everyone else. Once testing wraps up, we promote the changes to UAT with a reference to the newer version. No need to deploy the library itself, we only deploy the reference to the version number. Meanwhile, the other data teams—deep in the throes of their quarterly ping-pong tournament—don’t even need to worry. Their code can keep humming along with the older version until they’re ready to upgrade on their own schedule.
In short: versioning gives you the power to move fast, without breaking things, and even when Jim from Procurement Analytics is too busy celebrating his huge win to adopt what might be the most glorious package release to grace the halls of our archaic IT org.
Was it worth it?
Okay, maybe you’re thinking: “This seems unnecessarily complex. Why not just use the %run magic command to inject some code from another Notebook and call it a day?”
That’s a fair question—and really, it boils down to this:
Do you want to be a good data engineer, or a great one?
Do you want to build something that works for a few months or maybe a year, only to require a complete rewrite when the data model changes, the team grows, or business needs evolve? Or do you want to build something that scales with your organization, stands the test of time (at least until AI takes all of our jobs and we get plugged into the Matrix), and—dare I say—brings joy (or minimally appreciation) to the next engineer who inherits it?
The fundamental process that I used—Develop → Package → Distribute → Install—isn’t something I just made up. It’s how every piece of mature software on the planet Earth is shipped and consumed.
Spark source code doesn’t get manually copy-pasted to each VM when your cluster spins up by some guy named George. Pandas didn’t become the most widely used DataFrame library because someone shared a .py file on a Google Drive. And if you browse today’s open-source ecosystem, nearly everything worth using started with a dev like you or me, who had an amazing idea, followed standard SDLC practices, and decided it was worth sharing with the world.
Now, let me climb down off my soapbox for a second 😅
Yes, there are great uses for %run. No, not everyone is aspiring—or needs—to be a great data engineer. And maybe you don’t care about publishing packages, governance, or modular design—and that’s okay.
All I’m saying is this: evaluate what you’re trying to build.
If your goals include things like:
- “mature software development”
- “data mesh architecture”
- “modular, reusable code”
- “cross-workspace distribution”
- “organizational data operations”
- “unit testing”
…then maybe, just maybe, you should consider doing what every successful tech org has done for at least the last decade:
Treat data engineering a bit more like software engineering.
And if that still came across a little too strong, here’s a friendly list to wrap it up:
-
Cross-workspace, cross-tenant, or even 100% public distribution of code assets
The more seasoned a data engineer becomes, the more they think in terms of scalability, flexibility, and modularity. Why rewrite the same logic ten times with slight variations when you could write it once, publish it, and reuse it safely across your org? -
Minimized latency for code reuse
%rungets slower the more cells it has to inject. For complex ELT logic or large utility libraries, it quickly becomes a performance bottleneck—especially in interactive workflows. -
ALM capabilities
Once Fabric adds Git support for Resource folders, you’ll be able to integrate automated unit tests, packaging, and artifact publishing right into your CI/CD pipelines. Until then, manual builds from a Notebook are a are a huge step in the right direction.